Saturday, May 28, 2016

Custom Speaker Making

I've put together this page to help those who know that speaker prices in the stores can be ridiculous and no guarantee of quality. 

If you don't want to do anything but unpack speakers, consider buying complete speaker systems from reputable custom speaker builders such as:

Fully built systems from around $2,500 to $5,000 are typical and will beat most speakers at $20,000 in a store.

If you want to learn more about building speakers yourself, please start by visiting these sites:

Of course, I'm quite proud of the free DIY kits I have published on this blog, you can start by looking at the LM-1 posted here as well as my review of other kits here.

Stereophile Reviews - The Data Doesn't Lie

Update September, 2016:  The story has now grown to include the very short but biased review for the Crystal Cable Arabesque Minissimo which you can read here.


 Introduction

For a long time I've had trouble matching up Stereophile reviews with my experience of the same speakers. I think I've found the reason why. They aren't reviewing speakers at all. They are reviewing hearing aids pretending to be speakers. This is why they are so expensive.  What I mean is that the speakers Stereophile praises would only sound good to some one with hearing loss between 7kHz and 15 kHz, which I lack.  It's clear that completely different manufacturers have taken advantage of this  "trick."

I'm calling this trick the "Stereophile Curve" and the more I go back in time to look at megabucks speakers rated highly, the more apparent the truth of this curve becomes. Of course, the alternate, benign explanation is that the reviewers have all bought the B&W studio heritage hype, and they have become accustomed to thinking of the B&W 800 series speakers as a neutral reference, which, objectively, they can't be.


The Stereophile Curve

 A recent review in Stereophile for the B&W 802 D3 speakers prompted a reader (AV OCD I think) to post pictures showing just how similar the frequency response of the D2 was to the D3, despite the glowing reviews from Kalman Rubinson for the D3's superiority. The reader was right, the frequency response aligned nearly identically. Mind you, that's no proof of anything except that it's hard to match up the comments with the data. But as I looked more closely at AV-OCD's charts I realized that I had seen nearly identical measured response curve elsewhere, in the review for the Golden Ear Triton 5!

Several of the most highly touted speakers Stereophile that reviews not only have pretty ragged and, in my humble opinion, substandard frequency response, they are also ideal speakers for the hearing impaired. That's the nice way of saying, they are deliberately tweaked in the same way. Shenanigans say I!

Let's compare the B&W 802D, 802 D3 and the Golden Ear Triton 5:


See the dip around 6 kHz and the bump around 11 kHz? To me, having heard 2 of the three speakers in the chart above, this looks like the Marquis DeSade's setup. It also explains what the reviewers at Stereophile are raving about. There is no reason for this by the way except deliberate mis-tuning of the crossover from neutral or ideal. It also tells me this:

If you are using B&W 802 series speakers as references for record mastering or post-production, please stop it, stop it now! They aren't going to match most home speakers or any well-calibrated cinema.


Listen, if you like the sound of any of these speakers, and can afford them, you should go buy them, especially if you have complementary hearing loss but what you won't be able to do is to convince me that I'll like any pair of speakers Stereophile recommends, I just don't have the hearing loss in the same place that they seem to.

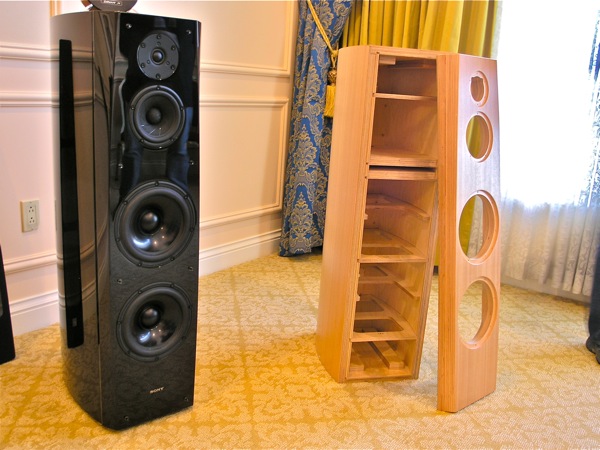
The Sony SS AR1 Review

The Stereophile review of this speaker was the most lukewarm review I've seen them publish for a $20,000 speaker.  What happened? The frequency response is not what is in vogue. Take a look at the Sony vs. the B&W 802 D3 measurements:


The B&W 803 D3 measurements are in red. I've circled all the important parts of the "Stereophile Curve" in red. As you can see, the Sony AR1 misses all the key parts. From the left, the 2.4kHz dip i s a known imaging/depth enhancment. It makes speakers appear to have better imaging than the recording actually has. Several Wilson's are tuned with this as are the Focal Sopra 2s. After that it seems to be a trait of the B&W's, regardless of their midrange. By the way, that Golden Ear was able to match B&W's curve so well is a testament to the versatility of AMT diaphrams. Being mostly resistive, creating an EQ curve to match other speakers is much easier.

Mind you, I'm not really happy with the Sony AR1 response anyway, it's not neutral but more of a party tuned speaker.  My point is that Sony did not know about the current fads in the high-end, and if they had they would have had a much warmer reception.

Exceptions to the Curve

There are exception to the Stereophile Curve, such as the Wilson Audio speakers, which just have terrible and inconsistent high frequency response. The Wilson XLF did seem to follow this curve though. YG Acoustics is one of the rare exceptions that proves the rule. Exceptionally good frequency response. Never heard them.

Explanations? Not sure, but they seem to correlate well with the number of full page ads. Take a look through any show report in the last 5 years at Stereophile. I'll let you punch me in the arm for any show report that doesn't include a painfully boring picture of both a Wilson AND YG Acoustics demo room. 

Alternatives to the High End Speaker Hype

The speakers that I like to listen to neutral and gimmick free, at least until my hearing gives out. If you feel the same way, please help stop the madness by buying from custom makers or by building your own speakers.

Please feel free to take a look at any of the good kits mentioned in this blog or my blog page which focuses on Custom Speaker Making, here.

Hearing Loss

By the way, if you do have hearing loss, building speakers, or adding equalization to make speakers sound better for you is quite easily and cheaply done! Dan D'Agostino, founder of Krell and now  his own company has had hearing aids specially tuned for him for years. He seems to have coped quite nicely! There's no reason why you can't remain a music and audiophile in the 21st century even with moderate hearing loss. miniDSP is your friend!

This blog post is not out to berate some one for a health condition. It may however berate an entire industry for selling hearing aids masquerading as loudspeakers for tens of thousands of dollars or more. Hearing aids, whether the kind you wear in your ear, or when disguised as loudspeakers should be affordable for all, and reviewers should know better. 

Friday, May 27, 2016

LM-1 Bookshelf Complete Part List

The part list for the LM-1 Bbookshelf Version is here. The only things missing is wiring and crimp connectors as well as adhesives and circuit board surfaces.

In the US Parts Express usually has all of these parts, especially the hardware but Madisound often has better driver prices. For the crossover parts I buy a lot of Mundorf MKP, Mills and Clarity ESA caps so I tend to buy most of those from Parts Connexion except for the Jantzen coils which always come from Parts Express.

For a detailed discussion about the crossover components and drivers please see the blog entry titled LM-1 Bookshelf Crossover.

Update: August 13, 2017: The Denovo flat-pack cabinets are about $50/pair vs. $190/pair for the Dayton cherry cabinets. The Denovo is about 1/2" shorter so plan on squeezing the woofer and tweeter together a little more.This should have a minimal effect on the final response. You may also wish to turn the woofer's around 90 degrees so the truncated edges are closer to the tweeter and bottom.


NamePart TypeValueSecondary ValuePer SpeakerPer Pair
C1,C3Capacitor8.2
24
C2Capacitor18
12
C4Capacitor1
12


L1Inductor0.4418 ga.12
L2Inductor1.215 ga.12


R1Resistor3.912 W12
R2Resistor1.212 W12
R3Resistor1012 W12


S1TweeterVifaXT25BG60-041
S2WooferPeerless8309911


CabinetDaytonTW-0.25 or TWC-0.25(Comes in pairs)1


Bass Port1.5"4" long12

Banana Terminals

(Comes in pairs)1


Acousta-Stuff


1 lb.

Sonic Barrier3/4"3-layer
1 Sheet


If you decide to make your own cabinet, you MUST maintain the baffle dimensions of 190.5mm x 304.8mm or 7.5" x 12" AND you must ensure the internal volume is at least 0.28 cubic feet.  The internal volume can be up to around 0.35 cubic feet, so don't sweat that so much.

Wednesday, May 25, 2016

Sony Speaker Costs

In the post A Cynical Discussion of Speaker Pricing I make the point that commercial high-end speaker pairs cost from 20 to 30 times the driver cost of a single speaker.  This is just a little math to make it easier, but it's equivalent to 10 to 15 times the cost of all the drivers in a  pair.

In this post I present a slightly more detailed example of this for those of you who are still incredulous. I'll use the Sony AR1. Sony is by no means unique in this field by the way, it's just that the Sony AR1 lends itself particularly well to public scrutiny. 
 
A discussion on another topic over at the DIYAudio forums led me to post an example of how speaker prices are so high. Here is a part of that discussion, and my thanks to the contributors including planet10 (Dave):

The Sony SS AR1 MSRP to Driver Cost

Here's a good example, the Sony SS-AR1.

All Scanspeak, off-the-shelf drivers, and they don't even bother to use the top of the line Beryllium tweeter either. Retail is around $27,000.

By the way, I am a huge Scanspeak fan, I think Sony did well to choose them. That's not the point I want to make here though! The real point is that at Madisound a hobbyist would spend around $2,110 in speaker drivers per PAIR! So, counting the speaker drivers, the markup from hobbyist to commercial speaker is around 13x. Add in that Sony probably gets a 35% discount and Dave is then exactly right, it's 20:1.

Of course, this doesn't count labor, lumber or crossover components, usually the crossover is not shown when they spend as little as possible on them.

Tuesday, May 24, 2016

LM-1 Bookshelf Crossover

Schematic

The schematic along with the driver simulation data is available in the form of an XSim file you can find in this discussion. Feel free to explore this design and it's choices. 

At this point in the exploration, I've completed the final draft of the speaker schematic. Having a little more time and energy I was able to get better measurements and re-think the crossover entirely. The final schematic is very simple and uses only nine crossover components.

In the end I used nearly symmetrical second order filters for both sections. The tweeter's -6 dB filter point is right at 2kHz but the woofer is rolled off a little earlier, around 1.5kHz. 

Let's take a look at the "transfer function" chart, or as XSim calls it, the "electrical response" chart. This plots the difference between the amplifier and each driver and shows us what our filter choices are doing electrically. Remember that these effects are additive to the drivers, they are never independent of the driver response or impedance.

As  you might expect, it's pretty simple. The woofer has no change up until around 700 Hz where the low pass filter begins. The super straight line is partly due to the zobel. Notice however that the tweeter level is significantly lower, about 6 dB below. That's because it's much more efficient, and we needed the R1 to bring it down.  The ripple you see in the tweeter slope is due to the tweeter's own impedance interacting with the high pass filter.

Tweeter Level

In the chart below the blue trace represents using the recommended 4.2 Ohm resistor. The red trace shows the effects of using an 0.5 Ohm resistor. The point of showing both of these lines is that you may substitute any resistor between 0.5 Ohms up to 5 Ohms while still maintaining excellent phase matching, so make yourself happy! 


Zobel Network

C3/C4 and R3 are a Zobel network which of course not only smooths out the frequency response of the woofer but in this case also allows for near perfect phase matching with the tweeter.  In a pinch, any combined value of C3 and C4 between around 8.4 and 9.4 will work, but 9.2uF is the optimal value.

Acoustic Distance

The acoustic center of the woofer and tweeter are offset by only 1.1". The small 5 1/4" driver is shallower than the 6 1/2" equivalent plus we are surface mounting it, pushing the woofer towards the listener. Thanks to this combination we have really struck crossover gold in terms of phase matching. A quarter inch the other way and this simple design would have turned out much more difficult.

Part Selection

For your convenience, a Complete Parts List is in another page, but here we discuss choices for the drivers and crossover components here.

Drivers

As with Kirk's design, I'll be using Vifa tweeters and Peerless woofers:
  • Vifa XT25BG60-04 1" Dual Ring Radiator Tweeter, $35. Please do not attempt to use the smaller, and only slightly less expensive Vifa XT25TG30-04, it lacks the low-end extension. This driver is also sold for more money under the Scanspeak brand. If you think you spy the tweeter in some megabucks speakers, you aren't wrong. It's the same unit, or often the next model down from this one.
  • Peerless 830991 5-1/4" GFC Cone HDS Woofer $35-$45
The $45 fiberglass driver could be inexactly substituted by the the Peerless 830656 paper cone woofer which cost around $20 each. In combination with the cheapest possible crossover capacitors you will get to around a $400 price point. Of course, the biggest savings is to build the cabinets yourself.

Crossover Components

I present a few different crossover grades below. Regardless of the choice of crossover caps and resistors I always recommend Jantzen air coil as the starting point. L1 should be 18 gauge, L2 should be 15 gauge. Do not use a bigger gauge coil on L2! The temptation is there, but the DCR is part of the design. If you must "mod" the coils, use a small-guage foil coil for L2 such as the Goertz 16 guage 1.2 mH coil available at Madisound or any other coil with a DCR between 0.330 and 0.4 Ohms.

Cheapest Possible

To stick with an absolute bargain build, use with Bennic caps and Dayton audio grade non-inductive resistors. 10W is close enough if they don't have 12W. You could save a few more bucks ($10 total) by using bi-polar electrolytic capacitors in the woofer, but please don't.

Frugal Freddie's Compromises

If you want to spend just a little more, I suggest Mundorf MKP ($8) for the 8.2uF cap in the tweeter section. Use Mills resistors. Audyn and Jantzen are also highly thought of.

Balanced Betty

Betty buys parts that are matched by the price and quality of the drivers. She would suggest Clarity ESA cap in the tweeter section of if you want to stay with all Mundorfs, the Mundorf EVO Aluminum in Oil. Either should be under $20.

Stick with Mills resistors everywhere, and Mundorf MKP caps in the woofer section.To keep costs down she might choose Axon caps in the woofer though.

To the left you can see my own build. I ended up using Clarity for the tweeter, along with mostly Axon caps in the woofer section. To make a boring story short, I happened to have 7.5uF Axon's lying around, so I got 1.8uF Mundorfs to make up the Zobel. All resistors are Mills.

The savvy builder will note that the coils are aligned in the same Z axis. Not to worry, the boards themselves will be mounted at 90 degree angles! One on the bottom of the speaker and the other on the side. 

The "OMG Are you nuts?" Build

Use Jupiter copper film caps for the tweeter. Capacitor cost? About $800 per pair of speakers. Hate your kid? Does he/she have an overripe  college fund? Do it!  OK, I'm kidding, it's completely out of balance. Save this kind of money for your $300 or more tweeters.


Please feel free to experiment with parts you like, can afford, and have available. These are just my personal recommendations. If you find caps you think work really well leave me a comment.

The Scientist Build

This speaker lends itself very well to learning about the sound of capacitors. The reason is the very high quality tweeter and that it uses a single capacitor. If you like the idea of experimenting with capacitors yourself, I'd suggest you wire the crossover so that the tweeter cap is external. Add a second set of banana jacks on the rear, spaced about 2-3" apart and connect the tweeter capacitor there. Now you have a very convenient experimentation lab which would allow you to swap capacitors or add small bypass caps instantly.

Driver Phase Matching

"Phase matching" refers to how well two drivers play together across the band in which they both  contribut. I usually use the -20dB level as my cut-off (more or less). You can see in the chart below that this is about 700 Hz to 3kHz. That's actually a pretty broad range brought about by the low crossover slopes. Still, notice that wihin this range the dotted red and green phase lines are so close together.

We can also see that the phase alignment where they cross 180 degrees is perfect. The longer the phase angles match the more the drivers will blend in with each other and disappear. Here's another view of that effect. Let's compare the normal response with an inverted driver (either one). In theory this is the absolute worst possible alignment:


Not only do we have a 20 dB dip at the crossover frequency, but look at how symmetrical and broad it is. Again, that the inverted driver produces this text-book null indicates the LM-1 have excellent phase matching before, during and after the crossover region. This will allow the drivers to blend in, minimize lobing and comb-filtering as the listeners location changes.

LM-1 Bookshelf Measurements

My Little Soapbox

The industry, commercial and DIY, has gone to trying to use purely theoretical environments to judge their driver and speaker performance with the idea that building an environmentally neutral speaker will make it suitable anywhere. Part of this is not just what's best, but also what's most convenient, and more marketable. And honestly you can be very successful this way.

Still, like Alison, I do not believe this to always be the best way to approach speaker design. My evidence is how many "bookshelf" speakers have become stand-mounts.  The LM-1 was tailor made for music lovers with modest listening rooms and small budgets, so these measurements and methods are completely suitable and accurate for their intended purpose.

Frequency Response

Allow me to present the simulated vs. actual response. The blue line represents the simulated response, the green line is the raw far-field, 1/6th octave response of the entire speaker placed so the front baffle just overhangs a 16" wide bookshelf.


The level is offset for clarity. When overlaid, the two graphs are in almost complete agreement.The simulation used close-microphone techniques to eliminate the reflections which plague us during crossover design. The green line however was taken at 3'.

What was not expected in this design is the dip between the port and driver around 74 Hz. None of the box simulations show this. The port's actual tuning frequency is "too low." Others may call this a happy accident though, as this brings the bookshelf/desktop response to.... (wait for it!) 40 Hz in exchange for the dip at 70 Hz.

You may also notice that the curve slopes downward, which is a good thing and shows the LM-1 closely matches the famous Bruell and Kjaer target curves.

Efficiency

As a result of carefully matching the speakers to their environment, we've come up with some pretty sensitive (for small) speakers, around 88 dB /2.83V at 1 meter. That's quite nice. Not in the range of horns, but small speakers like this usually really can't get such a good result. Note that part of this is that my drivers measured more sensitive than spec in the bookshelf, around 89 dB, and that the crossover excludes most baffle-step compensation.

Had we designed this blindly adding baffle-step compensation we would have ended up with a pair of speakers that were boomy, much less sensitive (83 dB or so) when placed in a bookshelf. Conversely, if we had tried to use this woofer in a stand mount we would never have this much bass. We would probably loose at least an octave.

Impedance

This is a very easy to drive speaker. The impedance stays well away from 4 Ohms at all frequencies and in fact stays closer to 6 Ohms for most of the plot. I would easily call this an 8 Ohm speaker based on this and how commercial speakers are rated. Here we have the simulated impedance charts for both versions of the speaker. The green line is of course the ported version:


These are just simulations, but the actual Z is very very close. I'll try to post them before 2017, but no promises.


Notice also the impedance below 200 Hz  stays above 8 Ohms! Oh my Dark Goddess of Espresso Coffee Beans, this is a dream speaker for most amplifiers. You could practically drive them from an iPod. Any receiver or integrated amp will be absolutely over-joyed to play these speakers.

Raw Files

The XSim files are available, letting you play with the crossover design yourself. Please join us at the DIY forums here.

Step Response

I don't have any tools right now to allow me to measure the step response, but I can simulate it using XSim. It's perfect for a 2-way that is not time aligned. The tweeter starts in a positive direction with just a touch of pre-ringing, and the bottom of it's response blends seamlessly into the rise of the wide-bandwidth woofer whose output is almost perfectly triangular. Outstanding!!


Conclusion

We have gotten really fortunate. In addition to the frequency response, it's very difficult to find a speaker with such flat response, low cut-off frequency (55 Hz-ish), high impedance, high sensitivity and fantastic phase matching across the crossover region. Usually we have to give one or more of these items up. Except for the limited output, these may be the best inexpensive full-range (kind of), high-end loudspeakers you can make yourself.

Saturday, May 21, 2016

Furman PL-PLUS DMC Power Conditioner - Dead Eye Mod


The Furman PL-PLUS DMC is a power conditioner featuring Furman's serial, non-sacrificial power conditioning technology. It's a very nifty unit I'd recommend to anyone.

One issue that may drive some to modifications however is the voltage meter. It's easily off by about 2-4%. due to the use of a low-tolerance part.  This may sound pretty good, but consider if you are in an environment with slightly elevated voltages, around 125VAC.  You'll see 130 which is a cause for real concern.  This is exactly why I hacked this unit to be within 1%. Though less frequent in residential areas it's quite common in commercial locations (auditoriums, office buildings, parks).

Of course, any time that you work in a device like this you take your fate and that of your unborn children into your own hands, so this is not for the inexperienced stupid, or squeamish. If you don't know that you must disconnect the unit from the wall before working on it, just stop, stop right here.

Open up the unit and look at the meter board.   You will see resistor R10 that is nominally 2.2k. The voltage reading is proportional to the resistor value here, so if, hypothetically, the meter was reading high by two percentage points, adding a high value resistor (around 180k) in parallel would correct the problem.  If the voltage is too low though you'll have to replace R10. These are all low voltage parts, so you don't need to go crazy with high voltage, fusible, yadda yadda but something thermally stable would ensure correct readings even in warm road cases. $1 tops. You could replace R10 with a 1%, thermally stable resistor, this will give you the best reliability regardless of your environment. Not needed for me. :)

So if you are a traveling roadie and need a dead-accurate voltage reading, you know what to do.