Thursday, May 5, 2016

Fiio X5II and E12A - Mont Blanc Edition

The E12A headphone amplifier is specially marketed for the low impedance and low sensitivity of in ear monitors.  While usable with any portable device that uses a 3.5mm stereo jack, the special X5II stacking kit makes it a breeze to attach your X5II semi-permanently. The amp itself comes with a number of Livestrong-like bands that help attach it to most portable devices.

As noted elsewhere, the biggest failing of the X5II seems to be the built in headphone amplifier. If it was just weak across the board it would still be useful.  Unfortunately by itself it sounds hard and gutless. As if only a tweeter was playing.  This is a little bit of an exaggeration, but it helps illustrate the problem with sound quality. Neither of my headphones played nicely with it despite having a broad (20 and 60 Ohm) variation in impedance.

The E12A, like the K5, really opens up the sound. You get much more spacious and neutral sounding playback. Also, and one other reviewer mentioned this, the X5II seems to break in.  Yes, I know it's nuts, but if you absolutely can't stand it at first, put it in a drawer and let it play for 4-5 hours before you listen again, then tell me I'm nuts.

Anyway, with either add-on amplifier the X5II is a much much better sounding DAP. However, even at sales prices I'm now out $471  ($299 + $160 + $16) in total and I don't have the slim profile of the iPod classic, and I dare say the Tobleron shaped Pono may actually fit my pockets better.

Issues

Oddly, the dual SD cards in the X5II are seen as 2 separate cards by my Windows 7 PC and Media Monkey. To keep from going completely crazy I ended up moving all of my classical collection to SD 2, and keeping all the Pop, modern and world on SD1.  I guess that's fine, but in the 21st century it's surprising to find a digital device that doesn't take care of stuff like this for you.

Another issue is that each device charges independently.

Lastly, un-strapping the X5II to place in the K5 is kind of a bother. It seems you need to commit to using the X5 as either your commuter player, or your desktop player with easy to drive headphones. This combination is not going to be able to do all things for you. Not that any other solution would either.

Conclusion

Overall, the X5II/E12A is a much better sounding solution than the X5II alone. It's much clearer and warmer than my 160 GBbyte iPod classic (currently snuggled into the glove box of my car) but it's still not as good as the $399 Pono. The Pono still sounds warmer and sweeter without any loss of detail, but the X5II/E12A is a really good combination and credible good sounding alternative.

Wednesday, May 4, 2016

Headphone Impedance

We often see speaker impedance charts from reviews, but rarely do we see them in headphones, so I thought it might be fun to do so for my two reference headphones.

One nice exception are reviews from InnerFideility which do include this information.  Why should we care about headphone impedance? The lower the impedance at a given frequency, the more current an amplifier must provide. Portable headphone amplifiers are especially limited in current drive. This causes the sound to track the impedance curve instead of the music. So, in general, a headphone with a higher impedance and low phase angle will be easier to drive to the same high quality sound. They will tend to sound more consistent across different headphone amplifiers.


To do this I used my trusted Dayton Audio Test System v. 2. Of course most use this for speaker testing, but what are headphones but speakers you can wear?

I have two completely different headphones I have been using as my standards. They're probably now considered quite old.  The headphones I turn to most often are the AKG K712.

The impedance plot was a solid 60 Ohms or more.


My other set of references are Shure E4c in ear monitors. I'm not even sure they used that term when I purchased them. They are definitely the most "discerning" or "demanding" of the two. While they have fantastic noise isolation, the bass doesn't open up except with the best headphone amps.  All others need not bother. This should not be a good thing! What buyers really should look for are headphones that play great with cheap amps. The minimum impedance here is a punishing (for portable amps) 24 Ohms.


The only portable player so far that I have heard play this very well is the Pono. I just wish the Pono had more features that would make it a no brainer.  The amplifier part of the player is just simply outstanding. I need to get either easier IEM's or bite the bullet and get a Pono. The other sub-$1k player that played these well was the UFO DSD DAC, until it died. 

Sunday, May 1, 2016

Affordable Headphone Solutions From Pono, Fiio, Oppo and others

I have been in the market for a headphone listening solution for a couple of years. I'm not quite sure what it is exactly, but my thoughts were something like a portable player and/or headphone amplifier/DAC.  This all started since the Apple iPod Classic was discontinued and I got a great deal on an AKG K712. I still have the iPod, but it's married to my car which is iPod only. The iPod Classic sounds fine, but not the best I've heard, and it's limited and fixed storage size has been an issue.

In the mean time my search for solutions continues. 

So, what IS ideal?  That varies from person to person, but they are, from most important:
  • Sounds great
  • $500 or less. 
  • Battery operated (i.e. portable)
  • Supports 128 GBytes or more
  • Support for Tidal music streaming
  • Nice if it can double as desktop DAC/amp
I've also been struck by how completely off some reviews have been compared to my ears. They tend to be universally positive with colorful and nuanced critiques regardless of the source. I really have to wonder about the reviewers. In any event, I present my own list:


Pono PMPOppo HA-1Fiio X5IIFiio X7EchoBox ExplorerUFO
TypeDAPUSB DAC/AmpDAP/UsbDAP/UsbDAPUSB DAC/Amp
Approx. Cost$399$1,200$299$650$449$430
PortableYesNoYesYesYesNo
Maximum Storage192N/A2561921 Micro SD Slot??N/A
Sound QualityExcellentSadisticSadistic-ish??????Very very good
Wi Fi TidalNoN/ANoYesYesN/A
DACESSESSBurr BrownESSBurr Brown???


Pono

As I have written before, the sound of the Pono Portable Music Player, regardless of headphones, is always excellent, musical and enjoyable. It handled both my AKG and Shure IEM's so convincingly and smoothly that is has been my reference standard for what a portable Digital Audio Player (DAP) should be. However it is hampered by a few things which have kept me from pulling the plug on one for myself: Size, features and storage.

The size is too chunky, the apps are non-existant and storage is limited to about 192 GBytes. There's no way to stream music from a NAS or online service.  If it had BluTooth connectivity (and BluTooth could do high resolution music) so I can play from my phone it would be hands down unbeatable.

UFO DSD DAC

I purchased a UFO DSD DAC from Blue Coast Records at a show and it worked for about 2 months before it died from what I believe were power supply  and overheating issues. Among the USB DAC's I've listened to under $1,000 the sound quality was simply outstanding, and almost as good as the Pono player. If mine had not died so quickly it would be an easy recommendation.  If you buy, make sure it's from a reputable vendor (such as Blue Coast Records) and save your receipt.  In a sense, it IS portable in that it can be driven from the USB out of a phone or tablet, which works surprisingly well given the limited power a phone could supply but it is far too chunky for a pocket.


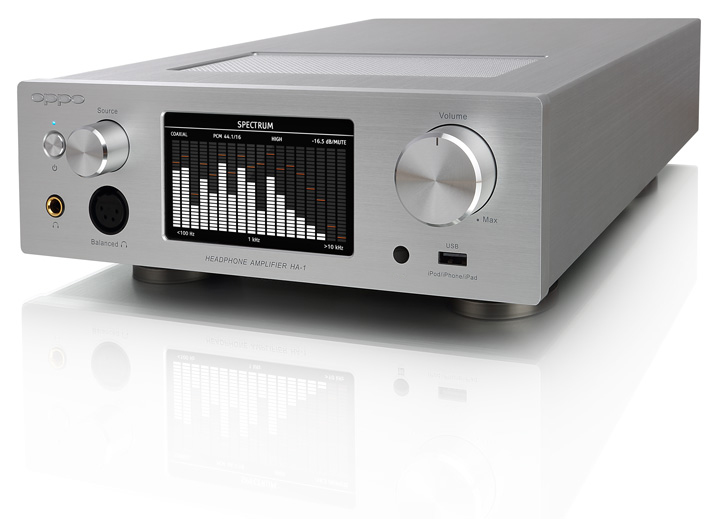
Oppo HA-1

This is a beautiful looking headphone amplifier and DAC from Oppo that I really wanted to like. The Oppo 103 BluRay player with it's 7.1 analog outputs makes my home theater life so simple and beautiful and easy to integrate with my music listening that I could not be happier or conceive of buying another brand of BluRay player, ever.

Then I come to this "thing" released by Oppo as the HA-1. Are they serious, or just being cynical? I can't tell really. What a hard, strident and difficult to listen to treble and limp sounding bass. I heard it at the 2015 California Audio Show, the same show where I heard the UFO DSD DAC, driven by a Macbook Air. It was literally the worst sound at the entire show, of any kind, and I heard some really bad rooms and bad music at that show. I thought perhaps it was me but I mentioned this to a fellow audiophile who owned one for about two months who described it as "fingernails on a chalkboard." It's a real shame because it's beefy, sexy and comes from a company I really appreciate for it's high quality products and connection to consumers. Perhaps it performs much better with their own headphones? I never found out. For about a third of the price, the UFO DSD DAC easily sounds better and takes up less space.

Fiio X5II (2nd Generation)

The Fiio X5II is an extremely well reviewed player that is now in it's second generation, as well as heavily discounted from it's original $500 to around $300. With the glowing and numerous consumer reviews, and Fiio, like Oppo, showing very good customer engagement, I was certain this would be a good player for my commute. Unfortunately, cold and alone it's barely listenable. The treble is such an ear drill it literally makes them feel hot after twenty to thirty minutes of listening. It's like when you've been out in the sun too long and your eyes ache? Imagine that in my ears. It's not hyperbole, it's exactly what it feels like. By itself I really can't recommend this player. The closest experience I've had to this is the Oppo HD-1, or speakers from Triangle.  Ouch. Not all is lost however for with an outboard amplifier this is a very good source.


Fiio X5II/K5 Combination

As an article at EnjoyTheMusic points out that the Fiio K5 headphone amplifier really improved the sound of the X7.  I have not heard the X7 at all, but It seems from my listening to the X5II/K5 combination that the K5 does in fact improve the sound quality of the player. Using the K5 the listening experience is much more balanced. The midrange and bass are no longer shy, the treble softens up, channel separation (or something like it) gets really good. Thanks to the K5 I'm not as ready to throw in the towel than if I had purchased the X5II by itself. Also, while I usually review with the AKG K712 my outdoor headphones are Shure in-ear-monitors, so I need to give them a good long listen in the streets to see if that is a reasonable arrangement.

I have also recently reviewed the Fiio E12A Mont Blanc Edition portable amplifier, which also does an admirable job of driving difficult headphones from the X5II.  If you are only looking for a portable solution, that may be your dream ticket. 


EchoBox Explorer

The $449 Explorer is an indy Android / Wifi DAP in a dapper looking whiskey flask design. It will constantly remind you to drink, so probably not good for those dealing with addiction issues, and what audiophile isn't? Still, it looks promising at a reasonable price. Like the X7, it aims to be an Android answer to the iPod Touch challenge. For those not familiar with the iPod Touch, they are essentially iPhones without calling abilities and as a result can run the full suite of iOS apps that don't require calling. To my knowledge only the X7 and Explorer are reasonably good Android equivalents.

Sadly I've never seen one in real life so cannot comment except to say they look very interesting!

Lessons Learned


I. The resolution of the playback files is much less important than the sound of the player.
 I'm not saying crappy MP3 files sound as good as everything else.  What I am saying is that the sound quality and balance of the player is a much bigger factor to my enjoyment of the music than the file resolution. This may not be true in my home system, but  it is here. I would much rather have the Pono sound at 44.1kHz/16 bit FLAC than the Oppo at any file quality.

II. Online audio reviews, even when apparently independent, are often completely off the mark.

III. DAC chip makers don't matter as much as the amplifiers.
Some audiophiles ascribe to the idea that DAC chips from manufacturer X are always better than Y, but putting together this report and going over my past experiences I can't agree with that at all. I've listened to ESS and Burr Brown devices and have found great and bad examples of both. My current and previous home DAC's had Burr Brown chips in them. The Pono uses an ESS chip.  The X5 uses Burr Brown. The Oppo 103 uses Cirrus Logic. There's no correlation in my experience that either chip is inherently better or worse.

I'll write more on this as I gain more experience. As always, please for the sake of the Dark Goddess of Coffee and Chocolate I worship, use your own ears to spend your own money. Buy what you like, always.

Wednesday, April 20, 2016

Focal Beryllium Tweeter Upgrade

Good news for all of you Focal owners out there! If you own a Focal Profile or Chorus from the late 90's you may be able to easily upgrade the tweeter to the latest Beryllium tweeter from ScanSpeak for a parts cost starting around $300 per speaker. 

Update:
I have a new campaign to bring this upgrade to the Focal Mezzo Utopia! Stay tuned here.


Background

The Focal Profile and Chorus line shared a design that mounted the tweeter on an L shaped bracket at the top.  It's fairly easy to remove it and then route a slightly larger hole for the ScanSpeak tweeter to replace it.

Unfortunately I only have really good measurements from the Focal Profile 918 speakers so I can only offer you exact advice on the crossover modifications needed for them.  However given how much Focal likes to re-use ideas and designs it's quite likely you can use most of this other Profile as well as the Chorus range of speakers as well.If you have speakers besides the Profile 918's you may need to take some measurements to select the correct crossover parts.

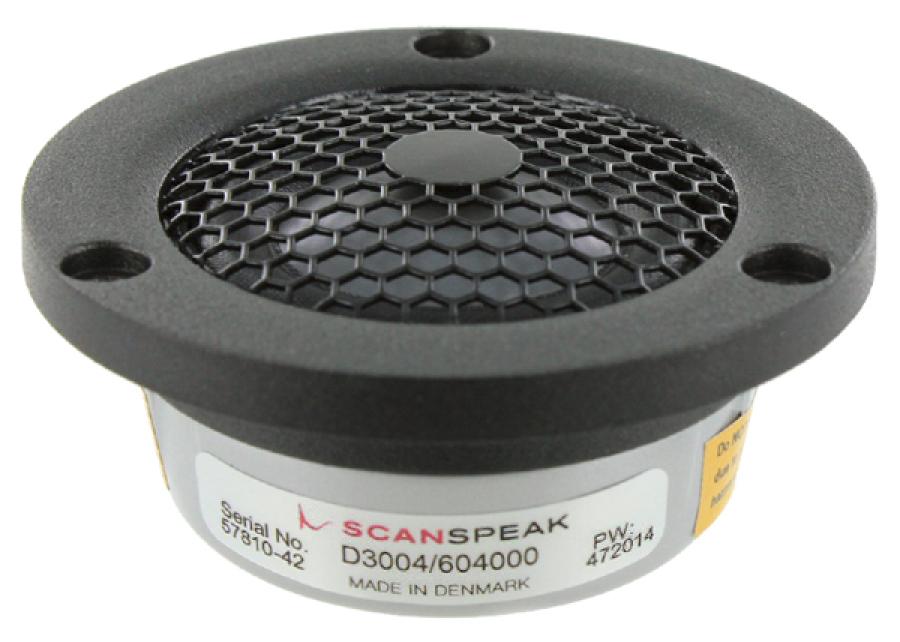
After a long search and then analysis I have found that the ScanSpeak Illuminator D3004/6040-00 is a pretty good physical, acoustical and electrical upgrade tweeter for all of the Focal Profile speakers and a relative bargain at $270 each.  Since the Focal tweeters are all severely under-damped, we are using the less damped of the two low-profile ScanSpeak Illuminator tweeters we could choose from. If you use this tweeter's larger sibling the 6040-10 the crossover parts will not work and you won't gain much in this application except a more difficult crossover design.

Sadly I no longer own the Focal Profile 918's.  I wish I did because if I had thought a little more about it I would have done this upgrade instead of all the others. Except pulling out the bass caps, which is still a good thing to do (see previous posting).

The chart shows the frequency response of a Focal Profile 918 before (red) and after (blue) the modifications. The raggedness you see in the Focal Profile tweeters is common to almost all Focal tweeters since they sharing a similar underlying motor structure. Tweaks to the back of the tweeter have been done in the Sopra line to unknown benefit. The infinite horn loading used in the Sopra is an idea Focal may have borrowed from Wilson Audio Specialties who did some work on improving the tweeter chamber in the previous speaker line, or from B&W's Nautilus. Sadly, the measured improvements seem modest and fail to overcome the shortcomings of the motor/dome combination in my opinion. 

Focal Profile, original vs. Be Tweeter
Using the ScanSpeak Be tweeter results in an unbelievably flat and smooth frequency response, and is not shamed by any mid-range Focal ever made. This sounds like the ravings of a madman until you realize one thing:


Focal Aria 936
ScanSpeak tweeters have a much better motor structures than Focal uses in their mid-range speakers, and possibly even the Utopia's as well.

Focal's tweeter motors have improved since the Profile range and as a result the Aria range has a much smoother treble than the Profile could achieve, as you can see in this chart from the Stereophile review of the Focal Aria 936, but in the end it is still pretty ragged. 
This upgrade is designed with two requirements:

  • The tweeter will be flush mounted to the face of the baffle.
  • The tweeter will be used without the grill cloth. 

The Profile range required the grill to extend the tweeter range at the expense of the overall smoothness of the response.  The superior construction and motor used by ScanSpeak makes those requirements unnecessary and the grill will actually be in the way. Chorus owners could probably go either way. However I have found the rickety plastic used tends to vibrate and create secondary sound sources.  The speakers are really much better off without the grills after this upgrade.

Modifications Required

You will need to make some simple part replacements to the crossover, and you will need to expand the tweeter hole by a few millimeters to fit the larger tweeter motor. The original tweeter and bracket won't be re-used. 

Tools

To make the modifications you'll need:

  • Plunge router
  • Circle cutting jig
  • 1/4" Spiral upcut bit (as recommended by jig make)
  • High power, preferably temperature controlled soldering iron with wide tips 
  • 3/4" wooden scraps. 
  • Long handled phillips head screwdriver to pull out crossover
  • Torx T25 to pull out midrange and woofer.  
  • Drill with 1/8" drill bit for tweeter pilot holes.
You really need the router and jig for this project. In addition to enlarging the hole you'll need to route a recess for the tweeter flange. It's not something you should freehand if you have any dreams of impressing your friends with your modifications.

Parts

A full schematic is provided below, this is just for reference:

Crossover Changes

The original tweeter filter, top left, uses a single resistor followed by a fourth order crossover. This will make these changes a breeze to make on the original circuit board since we are in fact removing parts. Note that the schematic part names don't correspond to the circuit board. You'll have to examine the traces yourself to be sure of what's what. Also notice that in the original design the tweeter polarity has to be inverted for the better phase matching.  Actually the original Profile 918's phase matching is rather crappy in either polarity. It's just slightly better inverted.


Here's a picture of the original crossover board from a previous blog entry. The resistor and caps you are interested in are in rectangles. The two inductors that you'll need to remove are the air core (i.e. donut) shaped coils at the bottom of the picture.

You'll replace the "Tweeter Resistor" with a new one. Discard both of the tweeter caps and place the replacement 10uF cap so it jumpers around both of them (C4 and C5 in the schematic).

Remove both of the donut-like coils.  Replace the last one with the new 0.27mH coil and you are done!


Here's the revised schematic.  The important part is on the top.  The new high pass filter is much simpler than the original due to better physical matching.  The end result is good, but not excellent, phase matching. It's certainly much better than in the original Profile, but could be improved upon with many more parts which I think are not worth it.

Also note that the ScanSpeak Be tweeter is in phase with the midrange.

There's nothing wrong Focal inverting the tweeter to improve phase matching. Given the location of the tweeter and overall crossover design, Focal's best choice was to invert the tweeter, but it did not end with idela phase matching except at the crossover point. I suspect part of the problems Focal's designers had was with the demands of matching the original tweeter to the woofer. It was a much bigger challenge than we have.

As noted in another posting, another quick mod  you can make is to eliminate C2. It's a waste of amplifier power.

Tweeter Mounting

Flush mounting the tweeter is the hardest part. What I may recommend is that you create a jig to help you use a router jig.  Use a scrap of wood about 6" by 2" and in the center add a wooden disk about the same radius and depth as the existing tweeter hole. The Focal tweeters are terribly small, around 36mm, but the replacement is only about 12 mm larger. You can make the disk using the same jig which you need to route the tweeter flange and cavity. Use hot glue to attach the wooden jig to the inside of the speaker cabinet so that the disk fills in the original tweeter hole. The disk does NOT have to be a tight fit. Just so long as you can eyeball it and have even clearance all around before the hot glue sets.


Caution!

Before routing anything on the speaker baffle double check that the new tweeter will have plenty of clearance after routing! Don't forget to check that you have internal clearance as well! You are going to be routing very close to the top panel. Make sure after routing that the body of the tweeter won't be blocked by the top cabinet panel. This will vary greatly by model.

If In doubt, put the new center 25mm below the top of the original hole. That should ensure you have the same clearance to the top as the original tweeters.   On the Focal Profile 918, this is going to be about 6mm below the original center, give or take.

Once you are sure of the center location for the new tweeter, route the flange and then the main hole.  Hopefully you can then pop off the strip of wood and reuse it for the next speaker.

Be sure to drill pilot holes before attaching the screws.  The MDF Focal uses is pretty soft. Attach with 3 Cap head screws per tweeter.

You may need to attach new quick-disconnects to the leads from the crossover to ensure proper polarity and sizing.  If the sizes are right, but polarity is wrong you can also switch the cables at the crossover end.

Tweeter Tweak

Add your favorite color of Pressure Sensitive Adhesive (PSA) backed felt around the tweeter and all the way to the edges. It will really help increase the sense of spaciousness and smoothness. There's a reason why Wilson and Vandersteen use this approach, it works.  Fortunately for us you don't have to do much to reap the rewards.  A couple of $1 felt sheets from your craft store will do great things.

Capacitors

It's really easy to go crazy with capacitors. My recommendation on the cheap but worthy side is a 10uF Mundorf MKP bypassed by an Audyn 0.1uF TrueCopper capacitor. That should be around $30/speaker. On the high end I suggest the Jupiter Copper Foil capacitor by itself for $399 at Sonicraft.

Somewhere in the middle of the range are the ginormously sized Clarity MR caps.  I strongly suggest you use multiple caps here though, it has slightly high ESR. It's a great cap, but you are better off with a pair of 4.7uF and adding an 0.68uF cap than buying the 10uF cap by itself. You could save a little money with the single 10uF cap, and maybe some sspace too but then I strongly suggest the Audyn 0.1uF TrueCopper bypass or Jupiter Copper as bypass caps.

What about the high-end Mundorfs?  Sure, you can go that route, but I find they add a Disneyland-like sheen to the music that draws my attention away. If on the other hand you find it magically enchanting, that's the way you should go. That approach certainly works for Magico and their fans, so you have plenty of good company. The Mundorf EVO Silver in Oil are among the best exemplars of this. I'm not really criticizing you at all. Just letting you know what the differences are. I find the Mundorf MKP under-appreciated and more musically honest. However buy what you like, damnit, and don't let my personal ideals get in the way of your good time.


Inductor

The inductor recommended here is a high-value but very good air coil core from Jantzen which runs $6 each, but you may also want to try the copper foil version, also from Jantzen for around $18 each.  Either way Jantzen makes very very good inductors. Given a choice though, the midrange coil is a much better upgrade to make to copper foil. The combination of new tweeter and midrange coil will enhance the overall velvety smoothness of the response. Make sure your coil axis are at right angles to any nearby coils.

Resistor

I always recommend Mills for being fabulously accurate, transparent, low noise and virtually immune to changes due to temperature.

What's Next?

If you want to really take your speaker to the next level, I'd suggest returning to the older post and doing the major woofer mods at the bottom. Increasing the minimum impedance of these speakers will make most amplifiers sing for joy. You'll gain dynamic range and bass depth that will embarrass any other Focal's short of the EM woofer Utopias.

Tuesday, March 8, 2016

LM-1C The Process

Here I'll quickly go over the process I took in designing the LM-1C.

As usual, my tools of choice are OmniMic and DATS V2 plus XSim.

Cabinet Selection

I'm not making my own cabinets, but instead selecting among available off-the-shelf cabinets from Dayton. I would like to say that I had simulated the bass response in a tool, then went looking for the right cabinet, but in fact that happened late in the process.

The truth is I doubled the cabinet volume for the LM-1 (0.281 cubic feet x 2 = 0.562) and looking for the closest appropriate cabinet.  This turned out to be the MTM-0.75.  Sounded too big, but in fact according to WinISD was too small. Anyway, using WinISD I plugged in the values for the Peerless 830991, and selected 2 drivers, vented.  WinISD wants a 1.4 cubic foot cabinet. Far too large for the location I'd like to put it in, so I retried with the 0.75, and set the port diameter to 1.5" (0.0381m).
 This raises the -3db to 64 from 50 Hz.  Since we're using this with a subwoofer, and a typical center channel speaker is cut off around 80 Hz, this is kind of an irrelevant compromise.  There's also a slight rise (0.5 dB) centered around 160 Hz.

Overall a very nice compromise.  Setting the port count to 2, WinISD recommends a 2 7/8" long port.

So, to summarize:

  • Cabinet Volume: 0.763 cubic feet / 21.6 liters
  • Ports: 2 x 1.5" diameter and 2 7/8" long
  • f3 = 64 Hz. 
You could also use the  Dayton 1 cubic foot cabinet, and get around 55 Hz.  Not worth the size. If you really wanted a high output center, you should probably select the larger 830990 Peerless drivers, justifying a larger cabinet.

Cabinet Preparation

Driver Location

Center the tweeter about 2 5/8" below the top edge of the baffle. The woofers are vertically centered on the baffle 5 7/16" away from the center.  Sorry for the odd measurements, truth is I did the driver locations in metric. 5 1/2" away from the center is probably close enough too. 

Routing

Next, is to route the driver holes and mount the drivers and ports. Here's what it will look like:

I have surface mounted the woofers, but inset the tweeter.  For the tweeter I set my router depth to 0.2" and first routed a 4 1/8" outer rim, then set the jig to 3 1/2" That provided me with the inner and outer flange rings.  Then select something in the middle to route out the remaining ring.


Wiring

Since I knew this would be my center, after testing I hot glued both of the crossover boards to the rear, bottom panel.  You want to keep the two boards apart, and out of the way of direct radiation from the woofers. 


Padding

By feeling the cabinet while watching movies I discovered that the front chamber is pretty vibrant ( literally! ) so I added some thick Sonic Barrier.  Multi-layer works best.  It's also good to put the crossover parts out of the way of the direct reflection from the drivers, and put a small piece directly behind the tweeter. Of course the tweeter itself doesn't create much standing waves in the cabinets but by adding padding around the tweeter we minimize the energy that hits the tweeter housing, and, by extension, the opportunity for that energy to re-radiate or distort the tweeter.

I half-filled the rear chamber with Acousta-Stuf and it does in fact reduce some left-over boominess. Place it so it's tucked up against the rear cabinet wall, and around the ports.  Ideally you want to leave the ports clear all the way to the drivers.

Felting Up 

I added a 4" wide sheet of PSA black felt underneath the tweeter to minimize diffraction effects. It's one of my favorite tweaks.  It's of course optional, but I encourage it, and it's cheap. Cut the circle out roughly, apply to the panel, and then use a sharp, clean razor to gently saw through the felt at the tweeter's flange cut out. 

Measurements

Measurements are the step that must be taken before crossover design can begin accurately. We must know the driver impedance, frequency response and acoustic offsets in order to begin.  For the LM-1C I've done this for you, but you may be interested in doing this yourself.

If measuring your own design, connect long test leads to the tweeter and run them out through one of the ports.  Do the same to 1 of the woofers, but jumper the two woofers so they are electrically in parallel.

Driver Impedance

If you haven't already, measure the tweeter impedance (i.e. Z).

Measure the woofer impedance in the cabinet. This can be done anywhere, so you can move the speaker to your PC if you need to.  This will give you the combined effect of the woffer and cabinet and port(s).


Drive Frequency Response

Put the speaker where you will use it. Follow the procedure for calculating driver distances, explained in a previous post. For now test the woofers together. For the woofer especially this is not a step that can be skipped.  In place the woofer, cabinet, baffle step, room and furniture will all come into play.

You might be tempted to take one of two alternative approaches in regards to the woofer testing:

Route 1 Woofer and Measure

Won't work because the box volume is 2x what you are simulating.  See what happens in WinISD with this approach.

Route 2 Woofers, measure 1

Nope, the second woofer will act as a passive radiator and screw with the impedance and FR.

There is an approach which would be equivalent:

Create half sized cabinet with 1 port

This is the only far-field approach which will yield the right results. However, it requires you actually build a test cabinet.

Hacking the files

Because we are using 2 drivers in a single cabinet measurements get a little tricky.

You can take one of two routes now.  You can pretend you measured a single woofer and create a single woofer in XSim which has the combined measurements or you can hack the data you gathered and in XSim to get data for 2 separate woofers.  The advantage of the second option is that you can try different things like a 2.5 way design if you want to or re-use the data to simulate a TW configuration in smaller cabinets.  A very useful thing if you are building a 5.1 system but only the center is dual-woofer.

Anyway, to estimate single driver data from this MTM cabinet you will need to do the following:

Hack the ZMA files

The driver impedance will change from the spec once it's in a cabinet, especially if you are using a ported configuration.  This is why to be accurate it's important to measure the impedance of the driver in place and not rely solely on published specifications.  However, it's not absolutely necessary. We can estimate that we only care about the impedance at the top end near the crossover point, and use the published specs, or vendor ZMA files.

The impedance of the individual woofers will be 2x the measured, but the frequency and the phase will be the same.  So open up your ZMA file, plop it into your favorite spreadsheet, including Google Sheets, and copy the three columns.  They are not labelled however they are:

  • Frequency
  • Impedance
  • Phase angle

In your copy, double the measured impedance values. Save it as the new, single driver impedance.

Hack the FRD files

The FRD files are similar, but the center column is amplitude. You'll want to do the same as you did above, but subtract (not divide!) 6dB from the amplitude. Save it and you have a new FRD file with the contributions of a single woofer.

Test your results

If you chose the dual simulated woofer approach you need to test that you hacked everything correctly.  For this we'll start creating the crossover.  Put down three drivers. Ignore S1.  Wire S2 and S3 in parallel:


Now, examine the Frequency Response and Impedance graphs.  They should match exactly the original measurements in SPL or Ohms.  They should not match the hacked files. The final result should be 6dB higher in FR and half the Z of the hack.

With either approach, you should be starting with exactly the same FR and Z as measured. Only then can you start the crossover design.

Now import the tweeter FR and Z (impedance) files, and start cooking.

Using other Tools

One thing I cannot stress enough is that this process is only as simple as it is thanks to OmniMic's automatic blending feature.  It automatically blends the gated high frequency response with the non-gated low frequency response.  If you use REW then you end up doing a lot of work that is not needed to get the right measurements before you can import them into XSim (or whatever your crossover design program is). Also, we don't need to calculate room gain and add it, blah blah blah. Our measurement and source of truth is the speaker and room itself. This process is faster and more accurate and less error prone by the nature of it's simplicity.

Lastly, don't trust most speaker maker's specs, especially the T/S measurements. The cost is no indicator of likelihood of accuracy.  ScanSpeak is notoriously off spec for instance, while the Focal and Peerless woofers I've tested are pretty close.  Buy a driver first and measure it before making cabinet selections.

LM-1C In Room Measurements

Free Field 

This first measurement I took last. I placed the LM-1C on a Hsu subwoofer and measured a foot away. Very smooth response:


In the bass 80 Hz is about -4 dB, but please note the extension to 20kHz! This is a perfect HT speaker! Especially for the outlay. I strongly suspect on a dedicated stand it would be even better. The curve is so close to ideal I won't bother with EQ here.

On Entertainment Center

Jaggedness below 500 Hz attributable to the usual room/speaker interactions, however the upper shape of the response is pretty much on target.  One good thing though is that the sensitivity at 1 kHz is actually a little better than predicted, and the response from around 600 Hz to 1 kHz is much smoother than predicted, a good thing. Plot was taken with 1/24th octave smoothing.

I also took the liberty of running some distortion measurements at 1 watt. The measurements past 800 Hz are all below 0.35% HD.  Most excellent values for the spend.

I may in fact have benefitted somewhat from the bass coil having unusually high resistance.  I used a pair of coils to make it, and the total coil impedance ended up being around 1.2 Ohms, yielding a much smoother mid-bass response. Never stop looking for serendipity!

Saturday, March 5, 2016

Introducing the LM-1C


The LM-1C speakers are part of the Leach Memorial speaker project, started here.

The 1C's are tonally balanced to be placed as shown, on an entertainment center. On or in an entertainment center however is never ideal so despite my best efforts, modest equalization will be required for them to sound their best. If stand mounting, EQ is strongly suggested to make up for the minimal baffle-step compensation built in.
  
Originally I was going to make the LM-1 and then add a center/D'Appolito-like speaker for the center or for those who wanted more output and clarity, but I made it first because I really needed a center channel more than I needed main or surround speakers. However, the qualities of a good center channel like this is exactly the same as for any other speaker in a home theater or stereo system. You may use the LM-1C as a center channel with four LM-1's or you can make all of your home theater speakers LM-1C.  The choice is yours.  There's nothing particularly "center" or "home theater" about the LM-1C.

The LM-1C is MUCH better free standing than the LM-1 however. The LM-1 does better in a bookshelf or on top of a desk or entertainment center. So this is one reason for choosing the LM-1C over the LM-1. 

Now, I did promise to post the design and details of the LM-1, but the 1C is a separate project.  It doesn't mean I won't post the schematic.  Just I won't be as diligent. The picture is the tweeter crossover prototype which I have built from parts I already had lying around. You'll need another small board for the woofer.

Instead of wire ties and anchors you can just hot glue instead. Wire ties are best for tweaking and experimenting.

As you can see, the LM-1C has the same driver complement as the LM-1, just doubled up on the woofers, and the ports are not the same either. One thing I've noticed so far is that the speaker needs to be tilted up to give the correct tonal balance. 

Here is the schematic.  I was using actual measured values for the coils, based on the parts I had on hand.

I used the  Dayton 0.75 cubic foot MTM in Cherry along with a pair of 1.5" ports cut to 2 7/8".


Costs

Here we go, the "money shot." Prices are for the individual speaker

  • Cabinet: $149
  • Drivers: $95
  • Crossover: About $75 and up. 
  • Miscellaneous: Speaker connectors, 2x 1 1/2" ports
Approximately $350 assembled.

Measurements

Update March, 2015:
I took measurements on top of a sub instead of on an entertainment center. Results were MUCH better than below, so I strongly encourage you to try this speaker out in free space on a stand if possible. Of course, if you can't, your receiver/processor's normal room EQ should handle the changes needed automatically.

Original article:
After assembling a speaker it's always a good idea to compare the finished impedance plot to the predicted plot.  This is a quick way to tell if you messed something up.

Here you can see I got it pretty much spot on.  The minimum impedance is around 4.3 Ohms at 195 Hz with an electrical phase near zero (not shown). If you are using any sort of solid state amplifier this will be a very easy load.  Some tube amplifiers may not be happy with the impedance peak though, so consider adding a 100 Ohm resistor across the speaker inputs if you are using a tube amp.  Also System7 over at DIYaudio likes to do this just to prevent the chances of ultrasonic oscillations.  May be worth trying.


Of course, what everyone wants to look at is the FR.  Sadly I only have the predicted so far.  I just don't have the time / energy to measure it again, especially since I'm still moving it around.  But for now, here is the FR as predicted by XSim.  As before, this should be far-field responses on the cabinet, as opposed to quasi-anechoic.  Scale starts at 20Hz.


Cheating with DSP

So this is all well and good, but putting a speaker on top of or in a TV stand is rarely the best sounding location even if it is the most convenient in the case of the center channel. At the end of the day I cheated a little by adding parametric filtering via miniDSP:

Center Channel EQ

Sadly I have lost the "final" results, but as you can see the EQ required was pretty modest, and mostly involved broad cuts between 70 and 250 Hz with a couple of boosts. I deliberately limited the EQ to be between 30 Hz and 500 Hz to minimize stress on what really is a small speaker, and to avoid over-EQing what is otherwise a pretty well balanced design.

The bosts at 62  and 300 Hz are 2 and 3 dB respectively, while the 3 deepest cuts average around 6 dB. Overall a good power balance, especially with the lowest change being a significant cut around 40 Hz. This should not stress the amplifier or speakers extraordinarily, and indeed when playing Pirates of the Caribbean and Battle Los Angeles at theater levels from 9' away there was no audible strain at all. In addition to this EQ, I relied on the Oppo 103's integrated bass management to provide high pass filtering at 80 Hz.

Of course, this EQ is very much situation dependent! I measured the speaker after I had placed the TV behind it, and then used OmniMic to create my filters, so I would not encourage anyone to take this chart and attempt to apply it to their own build.

What I mean to show is that a little judicious EQ can help improve the LM-1C or really any center channel speaker. Subjectively the thing that improved most was reducing boominess in the dialogue, which is usually in the 100-200 Hz range. Reducing that made dialogue much clearer and the center much more transparent.